ChewsLocal
 
Picture

This week's share included:


1 lb whole wheat linguini
1 stalk green garlic
1 head koboko cabbage
1 bunch kale
1 bunch collard greens
1 bunch mustard greens
1 piece raw-milk "swiss havarti"
1 lb red cherries
1 lb white cherries
1 1/2 gallon milk or bacon


Now, I know I've shared my new found love of the fresh whole milk, but this week we decided to try out the bacon (I mean, who doesn't love bacon?).  Also, the cherries this week are amazing.  I snacked on a bunch within the first minute of getting them.  I know I'm excited about the meals to come this week!
 
Picture
I can remember as a little kid when my mom first told me it was actually ok to go dig up the backyard (like most young males I had a tendency to destroy, dig, and build...anywhere I could, often against the wishes of my parents).  I grabbed a shovel, and began attacking the earth with a fervor close to a woodpecker hitting it's head against a tree at 4am in the morning to get that elusive grub.  This was amazing!  I was tearing up the ground all with the approval of my parents.  After a few hours, a couple of ice tea / cheese & cracker breaks later, I was done.  I had carved off ~ 10' x 10' section of the sod, leaving the rich, dark, brown dirt exposed.  Despite my best pleas, my father wouldn't allow me to use the tiller (insert visions of a 6 yr old getting thrown around by that powerful machine).  But that was ok, because as soon as the soil had been churned and turned and pounded into submission, the planting began.   Tomatoes, beans, cucumbers, squash, lettuce, basil, onions, etc, all went into the earth as seedlings or young plants.  I can remember my enthusiasm of finally finishing, and watering every day watching the plants grow and take shape.  Which, looking back, I now find strikingly ironic seeing how I DESPISED most vegetables as a kid.  Here I was, painstakingly taking care of these plants, the fruit of which I complained about when they arrived on my plate.  Perhaps it was the wonder of investing time and energy into something and seeing it literally grow and blossom in front of you.  Perhaps it's a younger sibling thing.  Perhaps, it was good training for gardening now.
 
Picture
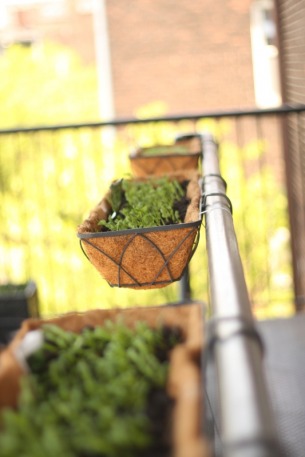
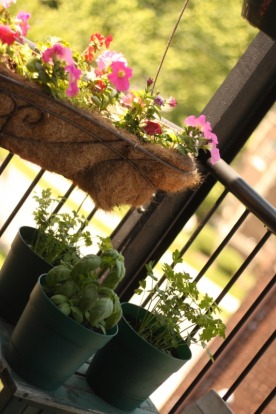
Living in an urban environment can make it difficult to grow a lot of produce.  Or at least I used to think so.  Sometimes you might be lucky enough to find an open spot in a community garden.  But, while there might not be a ton of flat, or even usable earth around you in which to plant (or, in some cases, like us living on the top floor of our apartment building, any), there is often a lot of horizontal space, and in our case, a back fire escape with wide landings providing just enough room to put some planters and hanging baskets.  Over the past few years we along with our neighbor on the top floor have turned that fire escape into a jungle oasis of flowers and plants.  Sadly, that neighbor moved away from the building into a house (I say sadly as this guy had the greenest thumb I've ever seen and could plant a mean flower arrangement in pots).  Thus, with an entire landing of a fire escape at our disposal (thanks to the new neighbors gladly offering their side to utilize), we decided to try our hands at utilizing the space to garden.     

Picture
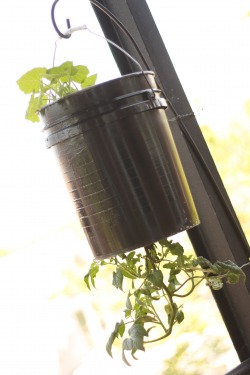
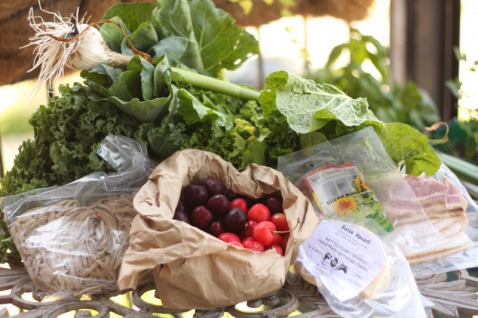
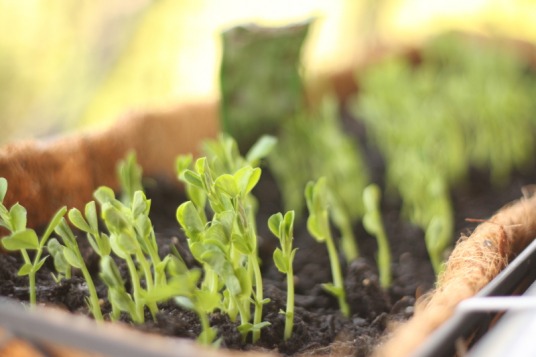
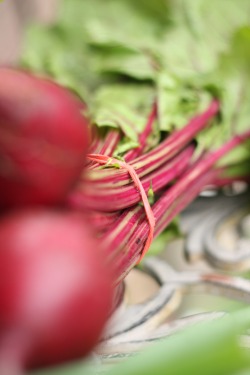
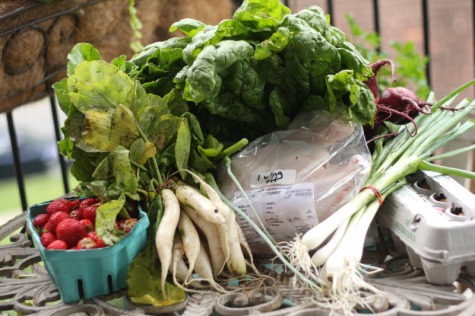
Using our long over-the-railing baskets troughs (we have 5 of them), we planted a few flowers (we're suckers for color), and then threw some spinach, swiss chard, mixed greens, and sugar snap peas into them.  Converting a milk crate into an onion bed was relatively easy (black trash bag + rocks + soil), and tucks away nicely into the corner of the fire escape.  To grow tomatoes (something we REALLY wanted), but lacking the ground space to plant, we turned to the upside down growing method.  It's really, quite easy actually (there are lots of sites such as oldfashionedliving.com that have instructions on how to DYI).  Basically, grab an old paint bucket (15 gallon will do.  I spray painted ours black to cover up the unsightly orange and to maximize heat absorption from the sun.  I don't have any scientific proof of this, but I'm going with it).  Drill out a hole in the bottom (to feed the plant through), pack with dirt, and go hang from somewhere.  For us, that somewhere (well, two somewhere's) included a wall hook/rod (with the permission of the building owner of course), and a shepherds hook fastened to one of the pillars on the edge of the fire-escape.  What's great about these planters too is that you can grow other herbs/etc on the top (we have squash in one of ours), maximizing your space and crop yield per unit area.

Picture
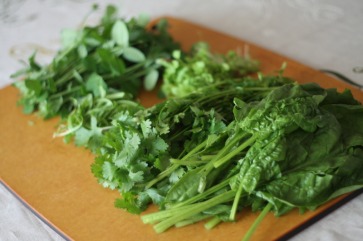
So while we don't have a lot of space, we've worked with what we do have utilizing hanging planters (to grow from both the bottom and top), over the railing troughs, and in the corners a few pots of herbs, onions, and some other greens.  I'm lucky to have Kate to keep me level headed though.  If it wasn't for her, I'd probably already have hauled 100's of lbs of topsoil up a ladder to the roof of the apartment to start a garden above our dining room thinking "look at all that wasted space up there that we could be using for growing!!"  Instead, before I could embark on such a doomed mission, she kindly reminded me that 1) our landlord probably wouldn't approve of having a farm on the roof of his building and 2) how would I water all the plants.  Crisis averted, and the excitement of watching the plants again bloom to life in front of me is just as wonderful as it was when I was a kid.

now if only i could find a long enough hose...... ;)

Picture
 
I still remember my first encounter with curry (and despite what this post title says, curry has a wonderful aroma to me.  At least it does now). Growing up, I often spent my summer afternoons with my older brother cutting through neighbors yards, over (and under) fences to get to the elementary school where we'd play basketball (or more like he'd have fun destroying his younger bother) for countless hours.  We'd often get carried away being brothers and suddenly realizing we were in danger of missing dinner, grab our stuff and sprint home.  One evening, I remember as i was running my little heart out, being hit with..this smell.  Filling up my nostrils, I almost gagged as I attempted to hold my breath. Finally escaping the death grip of the smell I asked my brother what that smell was, figuring he would know what that was (since he was older and wiser).  Thus, my first encounter with curry.  I have to admit, ever since then, I've always been hesitant to eat, let alone be around, anything that had been cooked with curry.  However, as I've gotten older with a fresh set of taste buds, I've found that the once pungent and overwhelming spice is rather delicious.  Give it a try (it's simple, and packs a delicious kick of flavor).
Picture
Simple Summer Chickpea Curry
This is a pretty simple recipe (should only take you about 15-20 minutes).  It has a few modifications (as indicated) from the original recipe found on very culinary's blog. 


-4 Tablespoons olive oil
-1 large onion, chopped
-1 tablespoon ginger powder
-1 tablespoon garlic (freshly chopped)
-2 teaspoons curry powder (Madras)
-2 Tablespoons tomato paste
-1 can (15 ounce can) chickpeas, rinsed and drained
-1 can (14.5 ounce can) diced tomatoes, undrained
-1 Tablespoon lemon juice
-2 Tablespoons butter (optional)
-1 teaspoon salt
-Pepper
-4 Cups fresh spinach (FFM)
-1/2 cup water
-2 cups rice


Prepare rice (you can even do this ahead of time if you know you'll be in a pinch for time the day this meal is to be eaten).


In a large skillet, heat your oil on medium high.  Add the onion, garlic, ginger, curry powder, and tomato paste (some will add a few tablespoons of sugar as well.  We choose to forego this ingredient).  Saute and stir frequently for about 3 minutes.


Following the 3 minutes, add the chickpeas, diced tomatoes (w/ the liquid), lemon juice, and butter (we didn't).  Season to taste with salt and pepper.  Simmer for 10-12 minutes, or until chickpeas are soft but not mushy.  Stir occasionally.


Stir in your chopped spinach and add the 1/2 cup of water.  Cook till spinach wilts (should be about 1-2 minutes).  


Serve over your hot rice.

 
Picture
I dread coming down with a summer cold. There's nothing worse than getting sick in the summer other than both you and your hubby getting sick in the summer. It feels like double the punishment. As if being sick isn't bad enough, laying in bed and sleeping through the brief days of sunshine we have in Ohio seems just plain cruel. I originally had pretty grand plans for the beet greens- which you can see in the above picture was the focus today rather than just the beets themselves. Then I got the CSA email for next week and revised my plan. Then I came home from work early and slept for two hours and nothing involving beet greens sounded too appetizing to me. And then I had an epiphany. Biscuits! Biscuits and gravy! That would make me feel better for sure! But then I realized I might feel better briefly, but gravy probably wasn't a brilliant idea. I stuck with my biscuit idea, but swapped the gravy for greens and the sausage for farm fresh eggs. I was dubious that the greens would be all that appealing considering how icky we both felt, but in the end this improvisation was a smash hit for both of us. I'm just glad we hadn't lost our sense of taste yet! Here's hoping its one of those 24 hour flu/cold type things and our house gets back to normal soon.
Picture
Green Eggs Minus the Ham
**Swap out beet greens for any green you might have on hand. Make sure your skillet is nice and hot when you cook 'em up since they will release quite a bit of liquid. Poached eggs have been somewhat of a magic trick I haven't quite mastered, probably due to my lack of patience. Hubby followed the directions in Ad Hoc at Home by Thomas Keller and they were perfect. Setting the timer for an exact 1.5 minutes definitely helped.

Fresh Biscuits: I followed a recipe in The Joy of Cooking and they came out great (especially with the butter I still have from last weeks CSA bundle), but use your favorite recipe or stop at Popeyes and get some for a fast dinner

3-4 Farm fresh eggs (Source: Martha's Farm)
Beet Greens (Source: FFM)
Spinach (Source: FFM)
1-2 cloves garlic
1-2 TBL spicy brown mustard
S&P

Bake your biscuits if you haven't already. Keep warm while you prepare the eggs and greens. Bring salted water to boil in a deep saucepan for eggs. Meanwhile, wash and prep your greens. Heat a skillet with olive oil or butter on medium heat. Saute greens until wilted and S&P. Add garlic when greens are almost ready, about 5 minutes after you first placed them in the pan. While greens finish cooking, poach your eggs one at a time for about 1.5 minutes for a soft yolk. Before plating, add 1 TBL of spicy brown mustard to greens and toss to coat. Plate up your biscuits, greens and then eggs. S&P the eggs and serve while piping hot. A little swiss or gruyere would be delicious shaved over the top, but I didn't have any so I skipped it. 

 
After a recent trip to the Tremont Farmer's Market (held on Tuesdays from 4-7 in Lincoln Park- look for a review in the coming days!) we were gifted a 4 oz container of chevre from Lucky Penny Farm Creamery to try. Being Greek myself, I have pretty high standards for all things "goat" and given that any cheese made with goat's milk is top of the list in my book of favorite cheeses, I was pretty hard on Lucky Penny. And she passed with flying colors! Enough of that slightly musky flavor coupled with a delicate creaminess (I never thought I would be able to use the word "delicate" in describing goat cheese, but it really was) was just about perfect. I say just about because although I could eat a tub of chevre or any cheese for that matter by itself, I knew this chevre was destined for something special. Wanting to avoid obvious uses such as in a salad, on a pizza, as an appetizer, I searched the worldwide web far and wide for dessert recipes that were more complicated than using the chevre as a garnish. Behold the chevre cheesecake! Quite a few iterations exist out there and I ended up adapting them to what I had on hand and my tastes.
Picture
Chevre Cheesecake
**I actually quartered this recipe as I didnt have 8 oz of chevre to work with, and halving it used all of the 4oz I did have which I was totally against. The recipe still turned out great even though I had to use a whole egg instead of 3/4 of an egg :) Top with homemade caramel (I was too lazy), chocolate fudge, fruit compote, or jam. The crust was not in the original recipe but I thought it was worth a try. I made sure to taste the chevre on a bit of cookie before I committed to pairing them together and it was great.


Crust
8-12 crushed ginger snap cookies (Source: Ivins' famous spiced wafers) (hand delivered by philly locals)
2-3 TBL butter (Source: FFM)


Cheesecake
8 oz Chevre (Courtesy of: Lucky Penny Farm Creamery, no compensation was received for the writing of this post reviewing their chevre. In fact, I dont even think the lady knew I had a blog and was just being generous after I bought some goats milk soap!)
1/2 C soft brown sugar, not packed! (I used dark brown as that was all I had)
1/2 C creme fraiche, I subbed sour cream as that's all I had and it was great!
3 eggs (Source: Holistic Farms, FFM)


Preheat oven to 350F. Melt butter and mix with crushed ginger snaps and press into the bottom of 6 ramekins. 


Beat sugar and chevre on medium speed with whisk attachment until completely smooth, scrapping down the sides of the bowl as needed. Add eggs one at a time and continue beating until incorporated. Fret not when the mixture becomes quite runny, the creme fraiche or sour cream will solve that. Beat in creme fraiche or sour cream until batter like consistency. Divide cream mixture between ramekins. 


Place ramekins in a roasting pan that can accomodate them all and add boiling water to the pan about halfway up the sides of the ramekins. Bake for 10 minutes and then turn the oven off. Leave cheesecakes in oven while it cools about an hour. When completely cool, tightly cover and refrigerate overnight until serving!

 
Picture
I am not a butcher.  While I may possess dissection skills and fine motor movements being a scientist in a research lab, tackling a chicken for some reason seemed daunting at first.  However, I must admit, even before I lifted the knife, I felt a sense of pride.  Pride in taking part in the actual preparation of my food.  Pride, in using a bird that was raised locally and naturally.  Picking up the boning knife, I went to town following some instructions in the book listed below.  A few cuts, pulls, tugs, and cracks later, the bird was deboned, and off to take a bath in it's brine.  Later that night, all I could think about was how..GOOD, that chicken was going to taste.  Every year, we head up to the local Greek Orthodox church for "greek-fest," days of eating, dancing, and socializing with the local community, all centered around being greek.  Among many (ok, all) of the delectable treats, one of our favorites is Chicken Riganati.  Well, tonight, after taking my first bite of this meal, all I could think about was indeed, how...GOOD, this chicken tasted.  Blown away doesn't even describe the flavor.  I was amazed at how the chicken actually tasted like, shocker of shockers, chicken, and how store bought, probably frozen and shipped birds, tasted like amorphous "meat."  Fresh poultry is definitely the way to go!  And if you want fresh, you're going to have to look locally!

Chicken Riganati a la Michael Psilakis
From his book, How to Cook a Lamb
YOU MUST BUY THIS BOOK! If not for the beautiful photography, the tasty recipes, at least for the stories behind the food. Being Greek myself this book struck such a strong chord with me.
**This recipe is certainly not for the faint of heart or those pressed for time. It requires the removal of most of the bones which is both tedious and time consuming. If that wasnt enough prep work for you, there's a brining step and a marinating step. When pressed for time, dont skimp on the brining step but you can shorten the marinating step if necessary. You will be rewarded with the most flavorful chicken you've ever tasted, I promise!

1 3 1/2 lb chicken (Source: FFM via Pleasant Valley Poultry, ours were between 4-5 lbs)
1 lb yukon gold or fingerling potatoes scrubbed
kosher salt and pepper
olive oil
greek oregano (Source: Fire escape garden, dried is fine if you dont have fresh)
1/2 lemon sliced
2 TBL fresh lemon juice
2 tbl water
butter

Brine (enough for 1 lb meat, make enough for how much meat you have :
1 quart cold water
1/4 C kosher salt
1/4 C granulated sugar (I decided to use dark brown sugar as Ive used it in other brines and prefer it)
1 C distilled white vinegar (*** I would recommend reducing this just a touch)

Marinade (also enough for 1 lb meat, make enough for what you're cooking):
1 C olive oil
3 cloves garlic, smashed and chopped
2 sprigs rosemary
Greek oregano
2 shallots sliced or onion if that's all you have

Essentially you will be spatchcocking your chicken but you also remove the thigh bone. I thought the directions in the cookbook were like reading Greek (haha) but engineer hubby was able to decipher them. The main difference in directions and spatchcocking is that you will cut the bird in half (you'll see what I mean in our plated dinner). The chicken could also be cooked whole, but keep in mind that the bones will add significant cook time. If you do take this task on, save the bones in the freezer for stock later.

Brine the chicken overnight- 12hrs- in the fridge. Marinate the chicken at least 4 hrs but overnight is okay too.

Take chicken out of marinade and let it come to room temp- this is super important for crispy skin. Parboil potatoes in salted water (about 3-4 min), drain well and slice 1/2" thick.

Preheat oven to 375F. Season chicken with just a little S&P and heat some oil in a skillet on high heat. Place chicken skin side down and do not move for at least 4-5 minutes to develop a nice golden crust. Flip chicken meat side down for about 2-3 min. Spoon out some of the fat and place skillet in oven for about 15 minutes or until thermometer reaches 180F.

In a second pan, heat some oil and saute the heck out of those potatoes developing a nice crust.

At this point, I deviated from the recipe because I was just so darn hungry. After I took the chicken out of the oven I poured the juices over the potatoes and added some lemon juice and served the whole shebang up. For the "right" way to do this, you'll have to get the book :)

Listening:

Artist: Ray LaMontange
Albumn: Till the sun turns black
 
Picture
Growing up, my dad always requested cherry rhubarb pie for his birthday "cake." And every year I was much more excited for the ice cream on the side than the pie. I just couldn't seem to get into the texture or the taste of rhubarb and cherry together- soupy stringy fruit just did not appeal to me. All that aside, when I met Les Paul at the Music Masters Ceremony held by the Rock 'N Roll Hall of Fame last year I became interested in trying rhubarb again. Given that his nickname was "Rhubarb Red" and he was such a legend, I figured rhubarb deserved another shot. (If you are still following this disjointed and random post, then stick with me- a great recipe is ahead.) When I heard we were getting some rhubarb in this week's share I was like a deer in the headlights- what do I do with it!? I wanted to avoid rhubarb pie given my previous aversion to it and I just couldn't seem to get into any of the savory dishes using it as a side to chicken. Finally I came across this recipe for a rhubarb crumb cake. I figured even if I didn't love the rhubarb, there was enough butter and sugar in the recipe that I would eat around it if I had to. In the end, I didn't have to eat around it because the slight tart-sour taste went perfectly with the coffee cake. And it wasn't stringy at all! I attribute this to the 'soaking' time the rhubarb spent with the cornstarch and sugar and the fact that I did not have to precook the rhubarb. It could be all in my head though, so what do I know. Now I'm hoping we get another batch because I'd like to take the plunge and try a savory recipe next!


Picture
Crumb Coffee Cake with Rhubarb
***I found this recipe on another blog and it was an adaptation of a New York Times Recipe. If you don't have rhubarb try another fruit- I bet it would be great!


For the filling:
1/2 lb rhubarb, trimmed and diced 1/2" thick (Source: FFM)
1/4 C sugar
2 tsp cornstarch
1/2 tsp ground ginger
1/8 tsp cardamom

For the topping:
1/3 C dark brown sugar
1/3 C sugar
1 tsp ground cinnamon
1/2 tsp ground ginger
1/4 tsp nutmeg
1/4 tsp salt
1/2 C (1 stick or 4 oz) butter, melted
1 3/4 C flour

For the cake:
1/3 C sour cream
1 large egg + 1 egg yolk (Source: Holistic Farms, FFM)
2 tsp vanilla
1 C flour
1/2 C sugar
1/2 tsp baking soda
1/2 tsp baking powder
1/4 tsp salt
6 TBL softened butter, cut into pieces (Source: FFM)

325 degree oven
Grease 8" square pan. Mix sliced rhubarb and toss with sugar, cornstarch, and spices. Set aside.

In a large bowl, whisk sugars, spices and salt into melted butter until smooth. Then add flour with a spatula. Press it together in the bottom of the bowl and set aside.

In a small bowl mix sour cream, egg and yolk, and vanilla. Mix flour, sugar, baking soda, baking powder and salt with the paddle attachment on your mixer. Add butter and a spoonful of sour cream mixture and mix on medium speed until flour is moistened. Increase speed and beat for 30 seconds. Add remaining sour cream mixture in two batches, beating for 20 seconds after each addition, scraping down the sides of the bowl with a spatula. Scoop out 1/2 C batter and reserve. Scrape remaining batter into prepared pan. Spoon rhubarb over batter. Dollop remaining batter over the rhubarb. Break the topping mixture into big crumbs and cover the ake. Bake 45-55 min. Cool before serving.

 
Picture
- 1 whole roasting chicken (4-5lbs)
- 1 bunch green onions
- 1 bunch red beets w/tops
- 1 bunch white radishes
- 1 bunch garlic scapes
- 1 bunch spinach
- 1 head soil grown romaine
- 1 dozen free range organic eggs
- 1 quart strawberries


ohhhhh man.  I feel like we hit the jackpot.  Well, we fee like that EVERY week when we pick up our CSA, but for some reason this week made us giddy.  Perhaps it's the fact that US is playing England in World Cup soccer in less than an hour.  Perhaps it's the lovely CLE weather.  Whatever the factors, this has the makings of a great week.  Stay tuned for some new recipes from the greek wonder that is Kate!
 
The first time I ever flew on an airplane was on my way to a service trip with my youth group. We were headed to Cusco, Peru and I kept having horrible flashbacks from the movie about the soccer team that crashed in the Andes and ended up eating each other. All that aside, the trip was the beginning of a significant change in my life and I fondly recall many memories including hiking up to Macchu Pichu one day. I stood at the top of one of the terraces and took in the view below and was just astounded that I was standing in a place that I had seen only in history books. It was as mystical and beautiful as you can imagine. The trip began to provide me with insight into a more global perspective and ultimately a more meaningful life.

On the trip, one of the things I learned was that potatoes were actually first discovered in South America. I guess I had always assumed they were native to North America because of all those bags of “Idaho Potatoes” I saw at the grocery store. I mean, if you’re going to say that potatoes are your claim to fame, then shouldn’t you have the market cornered? Anyway, I later also found out that most sweet potatoes in the US are of the yam variety which is quite confusing since it’s not a true yam or sweet potato at all. Amidst all this apparent confusion the sweet potato is actually very good for you with loads of fiber and vitamins. Another plus is that sweet potato vines are in the morning glory family and produce beautiful blooms as well. Unfortunately, I had never really been a fan of sweet potatoes until recently when I discovered that they are pretty awesome in savory dishes rather than smothered in brown sugar and marshmallows at Thanksgiving. Sweet potatoes go great with eggs and greens, so that was the inspiration for this recipe. If you haven’t cooked sweet potatoes without some form of sugar, give this recipe a shot and let me know what you think! Hopefully we will be receiving some local ones later in the season and I will highlight some of my other favorite recipes.

Picture


Warm Sweet Potato and Zucchini Salad


**I admit that this recipe doesn’t really fit into the theme of this blog since sweet potatoes aren’t in season. I’m trying to do a better job of cooking seasonally and locally, but I do have a soft spot for these little guys so I hope you will give me a pass just this once.


2-3 sweet potatoes, peeled and sliced ¼” thick
1-2 zucchini (green or yellow), sliced lengthwise ¼” thick
Salad greens  (Source: FFM)
Cilantro and Parsley (Source: Fire escape garden)
1-2 fried eggs (Source: FFM)
S&P

Dressing:

1-2 TBL Dijon mustard
1 TBL white balsamic vinegar
1-2 TBL olive oil


Brush olive oil on sweet potatoes and zucchini slices. Grill on your grill pan until tender. Note: The zucchini slices will cook much faster than the sweet potatoes! Make up your dressing. Cook fried egg, leaving the yolk a little runny. S&P your greens and divide sweet potato and zucchini plus greens into two or three salad portions. Drizzle dressing on top and “garnish” with egg. 


Listening:
Artist: She & Him
Album:  *** we didn't quite listen while cooking.  Went to the show immediately following eating dinner!

 
Picture
The Boston Red Sox are in town and they brought the Big Green Monster with them. Okay, maybe they didn't but the Big Green Monster was at my house tonight. I usually try to make sure our meals are a variety of colors because who wants to eat an all yellow meal? However, we were in the green tonight both literally and figuratively since our meal was a vibrant, fresh green in color and made with entirely local ingredients from our FFM bag this week. I didn't mind so much that our meal was monochromatic because it was a home run (ahh puns) in the flavor department that's for sure. With a pasta dish and a hard boiled egg (that we had left over from last weeks share), lettuce, spinach salad we were set!

When I saw that we would be receiving garlic scapes this week I was totally lost. I didn't even know what the heck these scapes were! But, I love garlic so I wasn't too concerned. After a bit of research (and finding a picture of these things) I was so excited to cook with them. I was hoping to get a large bunch so I could experiment with several recipes that I found but the bunch was pretty small with only two scapes. Then I found out we are getting MORE next week and all was right with the world. It's a good thing too, because these delicate fronds are absolutely delicious. The sharp garlic flavor with a hint of a scallion taste was going to go perfectly in a pesto over the spinach pasta from Ohio City Pasta. I'm excited to get a chance to try them in another dish soon!
Picture
Monster Green Pasta
**I really do need to work on getting exact measurements, but it's just not how I cook. So I apologize in advance for those of you that are frustrated by my recipes. I used pistachios in lieu of pine nuts because that's what I had on hand and I often use them in another pesto recipe. But feel free to make substitutions based on what you have and like!


1 lb spinach fettucini (Source: Ohio City Pasta, see link above)
bunch of scapes (I had 2, Source: FFM)
basil (Source: Fire escape garden)
pistachios (I used about 1/8-1/4C)
lemon juice (about 1-2 TBL)
olive oil (about 1/4 C)
feta (Source: Blue Jacket Dairy)


To make the pesto, finely chop scapes and put in food processor with pistachios (or other nuts), the lemon juice and a little olive oil. Pulse 1 min and add the rest of the olive oil and pulse until smooth. Add S&P.


Boil salted water for your pasta. Salting your water is extremely important and Gorden Ramsey is always yelling at the contestants on Hell's Kitchen about it. Don't be a donkey, salt your water! Cook pasta to al dente- fresh pasta takes about 4-8 min. Drain and mix with pesto and feta immediately. Serve warm.


Listening to as we cook 
Artist: The Black Keys
Album: Brothers