ChewsLocal
 
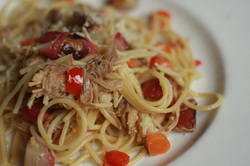
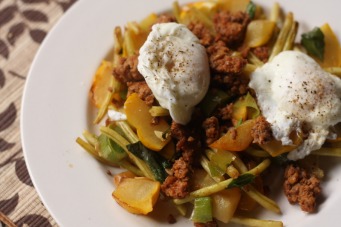
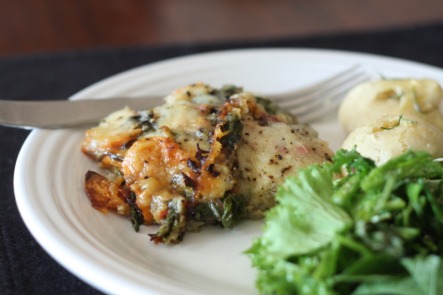
There's a new family in town and Im buying what they're selling. Murray Hill Market provides delicious Italian deli favorites and a good assortment of grocery necessities including wine in what used to be a wasteland for grocery stores. The proximity of this market to CWRU makes it an easy option for lunch. One of my favorite features is it's Kitchen table where strangers can gather round to eat. They also have outdoor seating available. Aside from all that, I have to tell you, their food is out of this world. So far their porchetta sandwich with swiss chard tops my list and I regularly crave it. I usually end up taking home a pastry or a pint of Jenny's Ice cream- the Lime Cardamom Yogurt is a perennial favorite. If you havent checked this place out, make plans to. I decided I needed some meat but it was too hot to cook it myself, so I stopped by and picked up a half pound of their shaved porchetta. The salty smokiness was perfect with the creaminess of the polenta.
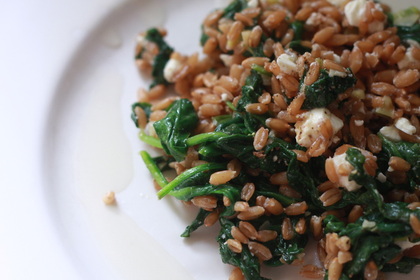
Swiss Chard and Polenta

**Adapted from a recipe on Cara's Cravings
This would have photographed beautifully. But Ive been writing my final manuscript for school, so I havent felt like dragging out the camera.

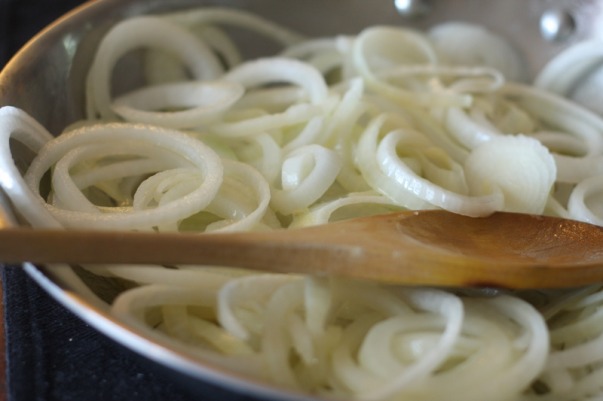
1 medium onion, thinly sliced (I like to use my mandolin for this!)
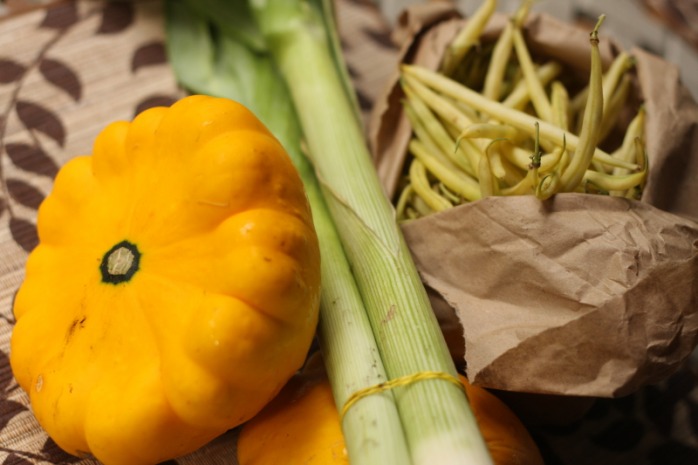
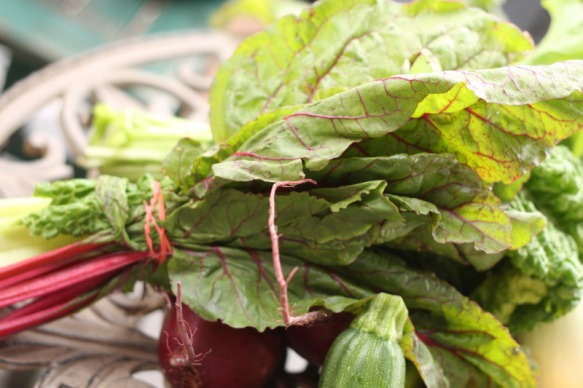
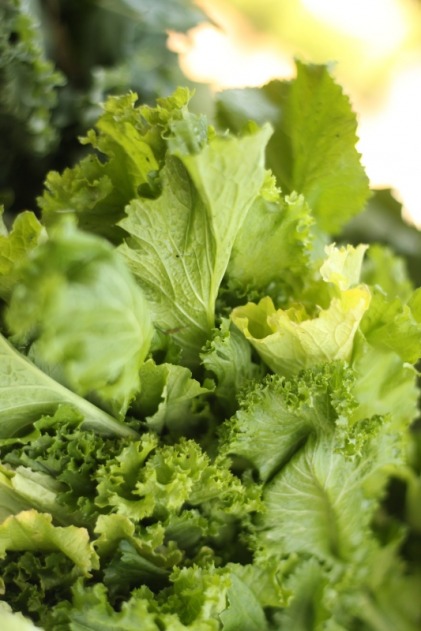
1 large bunch Swiss chard, or whatever green leafy veggie you have (Source: FFM)
2 cloves garlic, minced
1 C drained, rinsed cannelini beans
1 C soaked, drained dried chickpeas

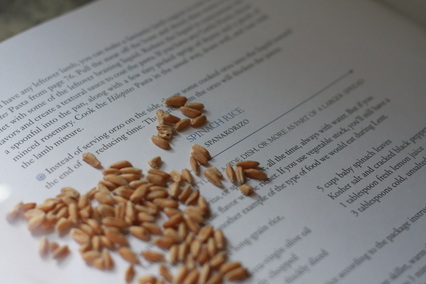
For the polenta (I used a variation of this recipe from Food Network)
2 TBL olive oil
3 C water or broth
1C milk (source FFM)
1 C cornmeal (Source FFM)
3 TBL butter
S&P
Parmesan or other cheese of choice

Prep your swiss chard by cutting off the thick stems and roughly chop leaves. You might have to remove the rib from the middle of your leaf if it's really thick and woody. Saute onions over medium heat in olive oil until translucent. Add garlic and beans and cook for about a minute. Add swiss chard and wilt down about 10-20 minutes until tender.

Bring water or brother to a boil. Gradually add the cornmeal while continually whisking. Once you have added all of the cornmeal, add the milk and cook over low eat for 20-30 minutes, stirring every 10 min to prevent lumps. Once the mixture is creamy, remove from the stove and add the butter, salt, and pepper. Gradually add the Parmesan.

S&P to taste


Picture
(Hopefully you get the reference to "El nino is spanish for, the nino") I've never considered myself to be much of a writer. I often have one or two lines of a paragraph that I think would be attention grabbing in the opening of a book, but that's where the creativity ends. Perhaps that's why I've developed a love of photography because a snapshot can contain a story in the blink of an eye. Despite my obvious lack of writing skills, I have been a voracious reader since I can remember. With the advent of the e-readers, my reading activity has sky rocketed now that I am no longer limited to reading what I can comfortably lug around. Case in point, on my vacation last summer, nearly half of my luggage was books... yes 25 lbs of books. I read all but one. Reading has always been a place of solace and comfort for me. Growing up, I was not always well received by my classmates so I often found myself secluded on some part of the playground reading. LM Montgomery's "Story Girl" was a huge comfort during the difficult 8th grade year. Even to this day, when my life feels out of control or too stressful to manage, I lose myself in a book. I read just as much fiction as I did back then, I am almost ashamed to admit, but I do find myself reading many memoirs. Recently, I read "Unbroken" by Lauren Hilldebrand and was enraptured by the story of struggle, resilience, and survival. Another non fiction book that has had a huge impact on my life in the past year while struggling with tragedy in my personal life, is "Bold Love" by Dan B. Allender. I highly recommend you read it.

Given my love of reading and cooking, I have begun to collect certain cook books that incorporate personal stories behind the recipes. I received "How to roast a lamb" by Michael Psilakis a few Christmases ago and not only have I enjoyed cooking from the book, but I especially enjoyed reading his story of growing up Greek. Spanikorizo was not something I grew up eating, but once I read the ingredients list I realized it was just spanikopita minus the filo plus the rice. Since I've been feeling lazy lately, this sounded like something right up my alley.
Picture
Spanikorizo
*Adapted from Michael Psilakis' "How to roast a lamb". Since spelt berries have a lot of great nutrients, I thought they would be a delicious substitution for rice. Turns out, I was right- this was a grand slam!


1-2 C spelt berries, soaked overnight (Source: FFM)
fresh spinach
feta cheese
scallions
shallots (if you have 'em, if not, use garlic)
lemon juice
good olive oil

Soak your spelt berries overnight so they dont take as long to cook. Boil soaked spelt berries for about 20-30 minutes in salted water until tender. I cooked mine until they had a little bite left just because I like that sort of texture, but cook them to your liking. Meanwhile, over med-low heat, saute your shallots (or garlic) and scallions briefly. Toss in the fresh spinach and cook until wilted, but still bright green.

Toss drained and still warm spelt berries with the spinach mixture and add feta. Season with fresh squeeze lemon juice and a generous sprinkling of fresh cracked pepper and kosher salt. Serve while still warm.


Unlike many of my friends, my mom very rarely made spaghetti and meatballs. To this day, I am still not really a fan of regular spaghetti with red sauce and much prefer a pesto, or simple drizzle of olive oil with some garlic and fresh parmesan.  I've been making more pasta recently because of the ease and filling nature of such dishes, and when I saw the radishes (which gave me so many fits last year!) I thought about adapting my standby Cacio e pepe to include them in lieu of the dried chickpeas I am so fond of. This is one of those "everything and the kitchen sink" dishes- whatever you've got on hand, toss it in. It ends up being a little strange, but I've found that no matter what ends up in the pasta, it's always super delicious.
Picture
Cacio e Pepe e Radish
***Cacio e pepe loosely translates to pasta and pepper. The key to making this taste so good is to use some of the leftover pasta water to make the butter and pepper dominated "sauce." And I promise, it tastes significantly better than it looked!


1 lb spaghetti, cooked al dente
Bunch radishes w/ tops (Source: FFM) **my tops were pretty wilted so I was unable to use them :(
diced carrots
diced red bell pepper
Garlic
S&P
Butter
Fresh parmesan, asiago, or romano cheese
Leftover chicken from Crockpot chicken earlier in the week

Cook up that pasta al dente and reserve about 1 C of the "pasta water." Cut the radishes in half and coarsely chop the tops. Saute radishes,carrots, and red pepper in olive oil for about 5-8 minutes and then toss in the greens for another 5 minutes. Veggies will be browned and somewhat soft at this point. Dump cooked radishes, greens and pasta together into a large bowl. In the same skillet, melt 3 TBL butter over low heat and mix with the "pasta water" and copious amounts of freshly cracked pepper. Toss in your garlic and cook for about 1 minute. Pour over pasta and radishes, toss and add chicken, cheese and salt.

 
In less than three weeks I will be basking in the delicious sunshine of Isla Mujeres, MX, enjoying my 2 for 1 mojitos and huevos machaca for breakfast. I have always had a soft spot for what I thought was Mexican food and margaritas. After my first trip to Isla last year, I realized I had never really had Mexican food, but some relatively tasteless goop on a plate. Although we don't have great traditional Mexican food in Cleveland, we do have great modern takes on the cuisine at Momocho. I crave their cucumber margarita with chile lime salt regularly, and although I never seem to get over there as much as I would like, it's still one of my favorites.

I've waxed poetic about my love for quinoa on this blog several times already, but I'm always on the hunt for new ways to prepare it. About three years ago I got sucked into the vortex that is the Pioneer Woman Empire and found many quinoa recipes on her new recipe site, Tasty Kitchen. I can think of no better way to enjoy the farm fresh sweet corn, cilantro and cherry tomatoes than to make this dish. Even if you aren't a Pioneer Woman fan, you have to try this recipe. I almost think it's better than the "real" thing.

**Sorry for no pictures. I was under the weather yesterday and I just was too hungry to get the camera out!!
Quinoa Taco Salad
***I always make extra of this as it makes great leftovers, with the flavors deepening over time. The recipe originally appeared on Tasty Kitchen and for once, I have made few alterations to it.

1 cup Quinoa
1 whole Red Onion, Chopped
3 cloves Garlic, Minced
½ cups Red Bell Pepper, chopped- I omitted all the peppers as I didn't have any on hand
½ cups Yellow Bell Pepper, Chopped
½ cups Green Bell Pepper, Chopped
1-2 C fresh corn, cut off the cob (Source: FFM)
1-½ teaspoon Cumin
½ teaspoons Oregano
1 teaspoon Chili Powder, Or More Depending On Heat Preference
1 dash Cayenne Pepper
15 ounces, weight Black Beans, Drained And Rinsed
¾ cups Diced Tomatoes, Fresh (Source: FFM)
2 whole Limes, Divided (or lemon juice if it's easier)
Salt And Pepper, to taste
8 ounces, weight Baby Spinach
1 cup Cilantro (Source: FFM)
⅓ cups Cheddar Or Feta Cheese, ** I used the raw milk Gouda cheese from this week's share (Source: Mayfield Creamery, FFM)


Cook the quinoa according to package instructions. I usually do this in the microwave- 5 minutes on high uncovered, 10-15 minutes on medium covered. Use a 1:2 ratio of quinoa to water. Let cool while you prepare the rest of the ingredients.

Meanwhile, swirl a bit of olive oil in a saute pan. Heat oil over medium high heat. Add onion and saute for 3-5 minutes, until translucent and tender. Add garlic, cumin, oregano, chili powder, cayenne and peppers and saute for an additional 2 minutes.

Remove from heat. Stir in the black beans, tomatoes, and the juice of 1 lime. Stir in the quinoa. Season to taste with salt and pepper. Chill. I often skip the chilling process as I'm just too impatient!

Roughly cut baby spinach into strips like you would shred iceberg lettuce for tacos. Remove about 1 cup of cilantro leaves from the bunch, rinse and pat dry, and toss with the spinach. Divide spinach and cilantro mixture evenly among 4 salad plates. Top each plate with a scoop of the quinoa salad. Top each salad with your choice of cheese and diced avocado. Cut the remaining lime into slices to garnish the plates.
 
Picture
To say that graduate student life is stressful would be a vast understatement. The long hours, the failed experiments, the anxiety over papers and grants, it's all a big ulcer waiting to happen. Somehow, I have avoided bad frozen dinners, greasy takeout (save for the few times Mama Santa's pizza was just what I needed), Ramen noodles, and bowls of cereal for dinner. I think it's because coming home from a place where you almost have to be perfect in your precision and being able to leisurely dice up some ingredients and toss them together to create something delicious but far from perfect is a great stress reliever. Plus I often make a giant mess and something about that is quite liberating compared to the sterile environment of working in a lab.

But there are times when the only ingredients I have in the house, or the only thing that sounds appealing to me. On Sunday I was hanging out with a friend and we were watching Food Network, which is basically a recipe for gluttony even when you aren't hungry. Then a commercial about free waffles at Hampton Inns came on and we both decided that waffles were definitely in order. But when cake covered in syrup  (or in my case, jelly) isn't going to cut it, savory breakfasts are some of my favorite things to make for dinner. Breakfast for dinner is always a good go-to meal when you are cooking for one. But on this night, I was blessed with some pretty good company- thanks A and G!
Picture
Patty Pan Squash Hash

2 patty pan squash, chopped into about 1" pieces (Source: FFM)
2 leeks, sliced (Source: FFM)
1 lb romano yellow beans (Source: FFM)
1 lb Berkshire Pork Chorizo (Source: FFM)
2 poached eggs (Source: FFM, I had some left over from a few weeks ago)
fresh basil
S&P

Prep your veggies and heat 1-2 TBL olive oil in a skillet over medium heat. Toss in your squash first and saute about 5 min. Add beans and leeks and increase heat to medium high in order to get some carmelization going. While your veggies are working, cook up your chorizo (or whatever you are using) in a non stick pan. Boil some salted water and poach your eggs 1.5-2 min. Toss veggies with chorizo (and resulting fat, it's seasoned from the sausage so don't throw it away!) and serve poached eggs on top. S&P to taste, and you could always garnish with some cheese too.

 
I have a unique love affair with squash. In particular, me and butternut are best buds and acorn and spaghetti squash are good friends. I think I ate squash almost every day for weeks last fall when squash was plentiful. Unfortunately, I am just not as big of a fan of summer squash for whatever the reason. I don't know if it's the flavor, the texture, or what but it just really isnt my thing. But I love the golden yellow and deep green colors on a hot summer day so I was pleased to see we received some in last weeks share.

Last night I was dying to cook so I quickly sauteed some summer squash and garlic, tossed it with the garlic chive pasta from Ohio City and garnished with some scallions and cheese. My favorite way to prepare summer squash is to saute it over high heat with olive oil in my stainless steel All-Clad pan. I love the caramelization that happens because honestly, I dont think summer squash has much flavor otherwise. If I had had some fresh cilantro on hand, it would have been a great addition to this light, fresh pasta. I'm loving the sunshine, but not so much the humidity so I was totally in love with this dish. Perfect for a hot and muggy day. I can't wait to eat the leftovers. I still haven't busted out the old camera, so I hope you will forgive me for a lack of photos. Hopefully next week will be better!

I had a reader question the other day about what to do with your excess green beans. Bring a deep saucepan of water to rolling boil, salted so that it tastes almost like the ocean.  Prepare your green beans (snap 'em if you like) and an ice bath. Blanch the green beans in the salted boiling water (water should be boiling the entire time for this process to work, so always leave it on high heat as the addition of the green beans will bring down the temp some) for about 2-5 min. I usually go on the shorter side so when I cook 'em up later they are still a bit cruchy. Immediately plunge the green beans into your ice bath to stop the cooking. Spread the completely cooled beans on a tray and freeze. Once frozen, pop them into a freezer safe bag. Cook just like you would any frozen vegetable you might by from the store. 
 
Picture
I'm a collector. Of recipes, of vintage and sometimes antique kitchen items and linens, cobalt blue glass, of good books, of passport stamps and memories. Growing up in St. Louis one of my favorite memories was checking out garage and estate sales with my mom and cousin during the summer. We'd always find something we absolutely had to have. I distinctly remember the day we picked up a vintage black and white pony purse (not a horse, but the pattern) and some gloves. Playing dress-up was never quite the same after that as store bought princess costumes just didn't seem to pack the same punch. My love affair with things old and "used" grew as the years went by, partially because of the frugality of it, but mostly because I love things with history. There's just something about furniture that has endured the ages or as my grandpa used to say, "They just don't make things the way they used to!"

When I lived in Scotland for a semester my senior year of college I collected china teacups from every town that I visited. I always smile whenever I use them because they bring back a flood of memories from that special time in my life. Although the photo of today's meal is less than impressive, the dish I served it in was a piece I collected from an antique mall near where I went to college. Considering one of our first dates when we first met in college was a picnic, it seemed appropriate to use this dish on a picnic at the Tremont Farmer's Market. Here's to things that last- memories and all.
Picture
Carmelized Onion Quinoa and Lentil Salad
** When I was preparing this dish to take to the market, I realized I was out of feta. An atrocity of epic proportions in our home, but I knew that Lucky Penny's stand would be there and could rescue us from our feta-less-ness.


1 C organic quinoa
1 C lentils de puy or any lentils you have on hand (I soak my lentils over night to reduce cooking time)
h2o
1-2 onions, thinly sliced 1/4" on mandoline (Source: FFM)
olive oil
butter (Source: FFM- it's the never ending butter roll!)
parsley (Source: Fire escape garden)
Chives (Source: Fire escape garden)
Cilantro (Source: Tink Holl Market)
Feta (Source: Lucky Penny Farm)
Sriracha Sauce
Lemon juice

Cook your quinoa (1:2 ratio) either in the microwave or on the stove top. Meanwhile, boil your lentils until tender and strain. Melt butter and olive oil in a skillet and toss in the sliced onions. Cook on medium heat until tender and reduce heat to medium low and continue to cook until golden. I never have enough patience for this step so I could probably cook mine a little longer than I do. I have also heard you can caramelize onions in the oven- something I will definitely try next time!

Slightly cool your quinoa and lentils and toss with a little bit of olive oil and lemon juice. S&P (keep in mind the feta will add some salt!), and a few drops of Sriracha Sauce (a little goes a long way here!). Chop up your herbs and toss with the rest of the ingredients. Crumble feta over the top and serve. This is great as leftovers either room temperature or cold, though I have warmed it up a little in the microwave before eating and it was great that way too!

 
Picture
Okay, what is with the Cleveland weather these last few weeks? I understand it's summer, and yes it's Cleveland where we get the worst of everything. And nobody better say, "In just a few short months you are going to be wishing for this weather, young lady!" because I totally won't (right).But, seriously! Where is the sun? Why is it as muggy as in Miami, FL?? The bad part of the weather is that it makes me want to skip cooking, let alone any semblance of dinner and just eat ice cream all day long. Bad for the body and bad for the blog. And sometimes, that's all that motivates me to get into the kitchen! I have no way to prove this, but I assume we have loyal readers or even semi-loyal readers who count on coming to this blog and seeing SOMETHING, ANYTHING. As the Pioneer Woman would say:
 
tap tap tap....

......is this thing on?

Anyway, so it's into the kitchen I go. After last weeks bounty of greens I was somewhat disappointed with this week's share. I don't know, nothing really "spoke" to me and told me what it needed to become. We all have those weeks I guess. But I think I came up with some exciting ways to use the produce. Let me know what you think and which recipe this week ends up being your favorite!
Picture
Swiss Chard and Sweet Potatoe Gratin
***I found this recipe on the Smitten Kitchen Blog and sort of halved it since I didn't have as much chard as she suggests and didn't want too heavy of a sauce considering the weather. Also, I put this together and baked it on Saturday and it heated up and served very well today- a great option if you don't feel like turning on the oven after a day at work or because it's too damn hot!


1 bunch swiss chard, more if you've got it!, washed and chopped coarsely (Source: FFM)
2-3 sweet potatoes, peeled and thinly sliced (1/8" setting on mandoline)
1 large onion, diced
2 cloves garlic, smashed and chopped finely
1 C whole milk or heavy cream (Source: Snowville Creamery, FFM)
1 TBL flour
1-2 TBL butter (Source: FFM)
cheese
s&p
fresh flat leaf parsely (Source: Fire escape garden)

Prep your onion, garlic, greens and potatoes. Saute onions and greens in a little butter. The original recipe warns against liquid and draining it off, but I didn't have any?? Set aside when wilted, after about 5 or so minutes. TIP: If you are using the stems, put them in first and let them soften up a bit before adding the leaves. I didn't use mine as I tossed them into my crockpot batch of veggie stock!

To make the sauce, melt the remaining butter and whisk in the flour. Cook for about 1-2 minutes and add garlic. Warm milk for about 30 seconds in the microwave or in a saucepan if you're anti-microwave. Slowly whisk in milk to avoid clumps. S&P the sauce- congratulations, you've made a bechamel sauce one of the mother sauces! Whisk over medium heat until thickened.

Grease a 9x9 glass pan and layer sweet potatoe slices, a little cheese, S&P, and then half of the chard mixture topped with half of the sauce. Repeat with remaining ingredients and put a little cheese on top too. Bake for about 45 minutes or so at 400F. I baked mine a little less knowing that I would be heating it up on Monday and because I didn't have as much sauce as the original recipe.

 
Picture
The difficulty with photographing food is that the food often tastes better than it looks. At least that's true at our house, anyway. Sometimes I think I've created an epic failure in the kitchen because it just doesn't look like the picture and in fact, kind of looks like a mess. This has especially been true in our kitchen as of late which I am sure you probably have noticed. Salads start to all look the same and lack the pizazz they have on your tastebuds. I even made a dish last week that looked so horrible I'm embarrassed to post it. But being a home chef means things arent always glamorous even when you are working with top notch ingredients. I have already waxed poetic about my love for greens in what I consider unusual preparations. I was so pumped this week to work with some of my favorite greens- kale, cabbage, collards and mustard greens. I made a very unique but delicious Thanksgiving stuffing with red mustard greens this past year that wasn't too well received by my very traditional in-laws. But I was excited to try some green mustard greens. The best part of Google reader is that I can search all my favorite blogs for "mustard greens" and every possible recipe pops up from people whose food I actually like. (I kind of feel like a commercial for Bing right now). I got lots of ideas and even though we are going through quite the heat wave recently I couldn't resist turning my oven on to bake it. I wasn't disappointed and boy was it worth it to heat the house up a bit. That's what fans and good food are for! 
Picture
Mustard Green Tart


**I found a recipe for this savory tart with Turnip greens and figured mustard greens would be a great substitution. Thanks to 101cookbooks.com for this recipe. I have made some changes based on what I had to work with plus I never seem to be able to leave a recipe well enough alone! You can substitute a homemade or store bought (if you have worked late, are lazy, or just plain bad at making pie/tart crusts like me) pie crust for the cornmeal tart shell if you are pressed for time. This recipe is extremely easy so don't let the laundry list of ingredients and instructions fool you.

Cornmeal Tart Shell
2 1/4 C AP flour
1 C spelt flour
scant 1 cup medium coarse corn meal
3/4 tsp salt
1 1/4 C unsalted butter, cut into pieces
1 large egg yolk
1/4 C cold water


Mustard Green Filling
1/4 lb mustard greens destemmed (*I used my entire bunch of mustard greens because I was using an 11" tart shell and because I didn't want to waste any greens, probably about 1 lb)
1 head of green garlic, finely chopped (no easy feat, use your food processor for sure) (Source: FFM)
2-3 green onions, diced (Source: FFM)
2 large eggs + 1 yolk (I ended up using about 4 eggs and 1 egg yolk because I had so many greens and a large tart pan plus I didnt have any heavy cream and I wanted to make sure it wouldn't end up too watery) (Source: FFM)
3/4-1 C vegetable broth (Source: homemade chicken broth using the bones from our chicken from last week)
1/4-1/2 C heavy cream (or, you can use 2% milk plus a few TBL of butter like I did- the butter from FFM is so good I could eat it on a spoon)
S&P
2-3 TSP dijon mustard
bunch parsley (Source: Fire escape garden)
Gruyere or Swiss Harvarti (Source: FFM, Mayfield Road Creamery)


Tart Dough
Combine flours, cornmeal and salt in food processor. Pulse in butter until pebble like mixture forms. Add egg yolk and 1/4 C water. Pulse and add more water if needed to make a ball. Divide dough into two pieces and chill for about an hour before rolling/pressing one disc into your tart pan. Freeze the other half for another day. Chill tart for about 30 minutes and partially bake with pie weights for about 25 min. Let cool while you prepare the filling.

***I did not have the time or trust that I could actually make a tart crust. So I bought a pastry crust and just pressed it into my 11" tart pan. I got the pan at one of my Bridal Showers 3 years ago and I haven't gotten a chance to use it until now and by was I excited. I could've used a regular pie pan as well if I wanted. I did not prebake my crust either. Just refrigerated it after I pressed it into the pan while I made my filling.

Chop greens and green garlic finely. Whisk eggs and cream and dijon mustard with the broth in a large bowl. S&P. Add greens, green garlic and parsley. S&P. Sprinkle some of the grated cheese on the bottom of the tart crust and pour the filling into the crust. Bake for about 30 minutes until the center is set. For the last 5 minutes of baking I sprinkled the rest of the cheese on top. Then I let it set on the counter about 5 or so minutes before I took it out of the pan and served it so that it could set up a little more.

 
I still remember my first encounter with curry (and despite what this post title says, curry has a wonderful aroma to me.  At least it does now). Growing up, I often spent my summer afternoons with my older brother cutting through neighbors yards, over (and under) fences to get to the elementary school where we'd play basketball (or more like he'd have fun destroying his younger bother) for countless hours.  We'd often get carried away being brothers and suddenly realizing we were in danger of missing dinner, grab our stuff and sprint home.  One evening, I remember as i was running my little heart out, being hit with..this smell.  Filling up my nostrils, I almost gagged as I attempted to hold my breath. Finally escaping the death grip of the smell I asked my brother what that smell was, figuring he would know what that was (since he was older and wiser).  Thus, my first encounter with curry.  I have to admit, ever since then, I've always been hesitant to eat, let alone be around, anything that had been cooked with curry.  However, as I've gotten older with a fresh set of taste buds, I've found that the once pungent and overwhelming spice is rather delicious.  Give it a try (it's simple, and packs a delicious kick of flavor).
Picture
Simple Summer Chickpea Curry
This is a pretty simple recipe (should only take you about 15-20 minutes).  It has a few modifications (as indicated) from the original recipe found on very culinary's blog. 


-4 Tablespoons olive oil
-1 large onion, chopped
-1 tablespoon ginger powder
-1 tablespoon garlic (freshly chopped)
-2 teaspoons curry powder (Madras)
-2 Tablespoons tomato paste
-1 can (15 ounce can) chickpeas, rinsed and drained
-1 can (14.5 ounce can) diced tomatoes, undrained
-1 Tablespoon lemon juice
-2 Tablespoons butter (optional)
-1 teaspoon salt
-Pepper
-4 Cups fresh spinach (FFM)
-1/2 cup water
-2 cups rice


Prepare rice (you can even do this ahead of time if you know you'll be in a pinch for time the day this meal is to be eaten).


In a large skillet, heat your oil on medium high.  Add the onion, garlic, ginger, curry powder, and tomato paste (some will add a few tablespoons of sugar as well.  We choose to forego this ingredient).  Saute and stir frequently for about 3 minutes.


Following the 3 minutes, add the chickpeas, diced tomatoes (w/ the liquid), lemon juice, and butter (we didn't).  Season to taste with salt and pepper.  Simmer for 10-12 minutes, or until chickpeas are soft but not mushy.  Stir occasionally.


Stir in your chopped spinach and add the 1/2 cup of water.  Cook till spinach wilts (should be about 1-2 minutes).  


Serve over your hot rice.